With the rapid development of high-precision large-scale industry, especially in aerospace, shipbuilding, and machinery manufacturing, and the increasing size and complexity of products, the demand for precision position and dynamic attitude measurement of large-sized workpieces has also increased. For example, large-size precision measurement technology has become the core detection means in manufacturing.
International aviation manufacturing enterprises, such as Boeing, Airbus, etc., have been on the manufacturing, assembly, and failure maintenance of the whole process of online automated measurement of technology certification, measurement also from the two-dimensional drawings to the development of three-dimensional CAD model. As a result, large-size precision measurement technology has emerged.
The technology is mainly based on high-precision and high-efficiency digital measurement systems, such as CMM, laser tracker, indoor GPS, etc., with different measurement principles and scopes for each system. The international application of this technology has enhanced measurement accuracy and efficiency, and further improved assembly accuracy and quality; while China’s is still in its infancy and under-researched.
Based on the analysis of different measurement systems, this paper focuses on key application technologies such as digital assembly, multi-system integration and data fusion, measurement-assisted assembly, model-based quality assurance, and, measurement uncertainty analysis, with a view to application for China.
Digital Measurement System
At present, for large-size precision measurement, advanced digital measurement systems mainly include CMM, articulated measuring arm, laser tracker, indoor GPS, LIDAR, digital photogrammetry, and so on. According to the contact measurement and non-contact measurement of the existing digital measurement system for classification.
1. Coordinate Measuring Machine (CMM)
CMM is a high-precision contact measurement tool, usually used to measure complex surfaces and check the geometry of the workpiece. The principle is to form an orthogonal coordinate system through three mutually perpendicular guide rails, and the probe moves along the guide rails, thus realizing the three-dimensional coordinate measurement of the target point. CMMs are widely used for jig and fixture measurement, CNC machine tool inspection, and in-line measurement of flexible production lines.
The main advantages of this system are high accuracy and stability, which can provide very accurate measurement data and good adaptability to the measurement of large-size objects. Global CMM manufacturers, represented by Hexagon, dominate the market.
2 .Articulated measuring arms
ArtiAn articulatedsuring arm is a flexible measuring tool that calculates the coordinate value of the target point by the length and angle of the articulated arm. This measurement system can overcome some of the limitations of CMMs and is especially suitable for the measurement of narrow spaces or irregular objects. Compared with traditional CMMs, articulated measuring arms are smaller, lighter, and, have a wider measuring range.
Currently, the most common articulated measuring arm products on the market are 6-degree-of-freedom articulated arms with high mobility and portability.FARO, CimCore, and ROMER are currently the main manufacturers in this field.
3.Laser Tracker
Through the laser interference ranging and mutually perpendicular high-precision encoder angular measurement, and with the ball prism and other cooperative targets for contact measurement, and then according to the principle of polar coordinate measurement to calculate the spatial three-dimensional coordinates of the target point, as shown in Fig.1 for the laser tracking instrument measurement principle diagram.
At present, the world’s laser tracker is mainly manufactured by three major manufacturers Leica, API, FAROand manufacturing, typical products are Leica AT901, FARO IO, API T3ATI Radian, etc., and China’s is currently blank.
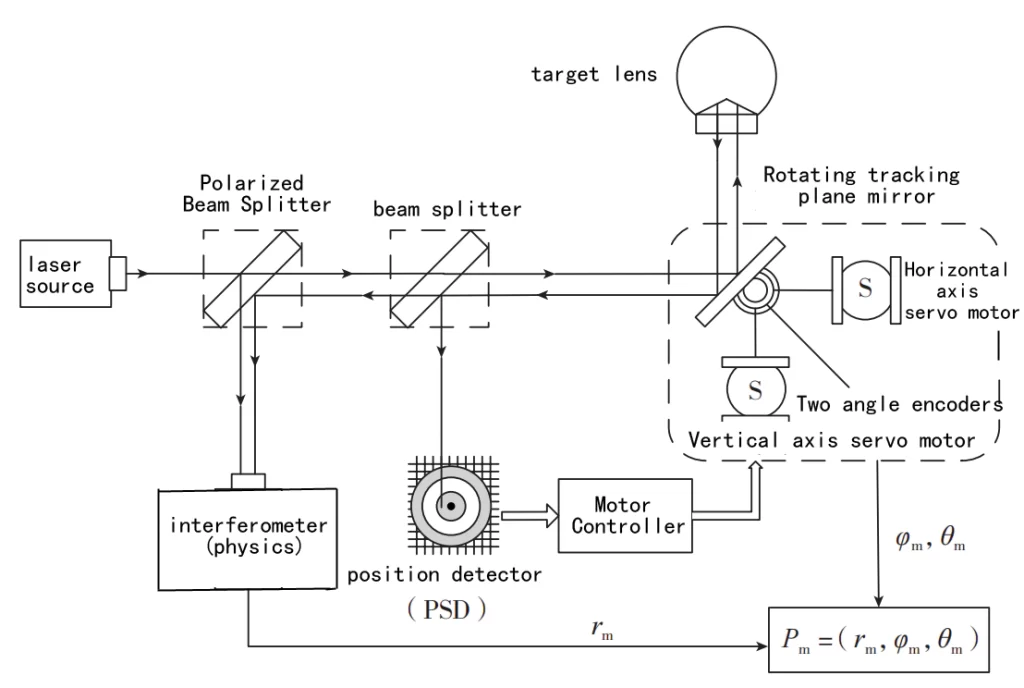
Fig.1 Measurement principle diagram of laser tracker
4.Indoor CPS
Establish a three-dimensional coordinate system, the use of the triangulation principle through infrared measurement to obtain the target point coordinates. Fig.2 shows that the transmitter transmits a shaped beam and the receiver receives the signal timing diagram.
The transmitter transmits three beam signals, respectively, two rotating fan beam signals around the transmitter and an LED pulse signal, through the receiver to receive the signal time parameter, you can solve the measured point of the horizontal azimuth and vertical azimuth.
The receiver receives two or more generator signals and uses the principle of triangulation to calculate the spatial three-dimensional coordinates of the target point. At present, the international manufacturer is Metric (now belongs to Nikon Metrology) company, China’s Tianjin University has also carried out the development of similar indoor GPS.
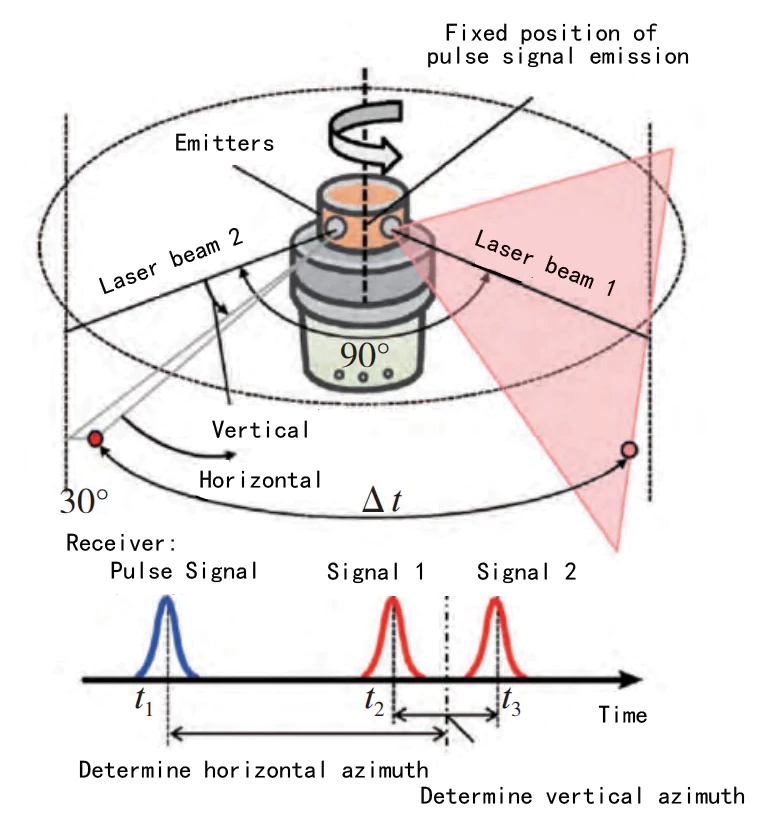
Fig.2 Measurement principle diagram of indoor GPS
5.LIDAR
LIDAR is an advanced non-contact measurement tool, which accurately measures the three-dimensional coordinates of the target point through the frequency difference between the laser and fiber optic signals, combined with an angle encoder. With the functions of point measurement and profile scanning, LiDAR can quickly obtain a large amount of data, while having high accuracy and anti-interference ability. Its main application areas include automated production lines and non-contact measurement of large workpieces.
Metric is a leader in LiDAR technology, especially in the aerospace field has a wide range of applications.
6. Digital photogrammetry
Digital photogrammetry is a non-contact measurement technology that obtains the spatial 3D coordinates of a target by taking multiple digital pictures and using computer software for automatic processing (including automatic positioning of marking points, automatic matching, and stitching). This method is highly adaptable and capable of efficient measurement in complex environments.
However, digital photogrammetry also has some disadvantages, mainly reflected in the susceptibility to light source changes and external environmental interference, and when the number of targets is large, the complexity and time cost of data processing will also increase. Currently, GSI and AICON 3D are the main providers in this field.
Integration of Large-Size Precision Measurement and Assembly
With the continuous progress of manufacturing technology, the integration of large-size precision measurement and assembly processes becomes more and more important. Traditional measurement methods can no longer meet the high requirements of modern manufacturing for precision and efficiency. Therefore, the organic integration of measurement and assembly process has become the key to improving manufacturing quality and productivity.
The integration of large-size precision measurement and assembly not only requires accurate control of the measurement process but also requires the full integration of data, process, design, and manufacturing process, to realize the fully digitalized and automated high-efficiency assembly.
1.Theoretical framework of measurement and assembly integration
Maropolous proposes a theoretical framework centered on the measurement process model to realize the integration of measurement and assembly. The framework emphasizes the data integration of assembly simulation, tolerance analysis, and measurement-assisted assembly to ensure the smooth connection of each link.
Specifically, the integration of measurement and assembly is divided into two main processes: the virtual design-assembly-verification process, and the physical design-assembly-measurement-automation process. This theoretical framework not only provides theoretical guidance for high-precision measurement but can also help manufacturers optimize the assembly process and improve overall efficiency.
As shown in Fig.3, the framework conceptually explores the properties of the measurement process model and clarifies the implementation steps of measurement and assembly integration, including the creation of the virtual design, the execution of the actual assembly process, and how to verify the accuracy of the assembly using precision measurement technology.
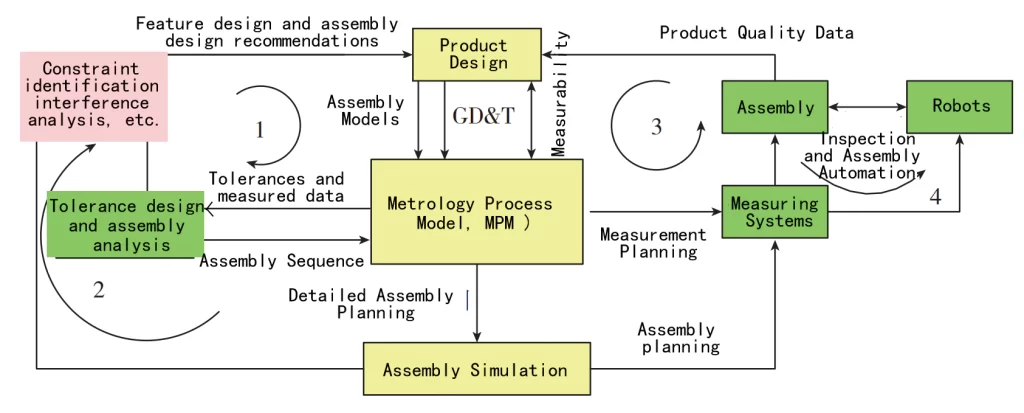
Fig.3 Integrated theoretical framework of measurement and assembly
2.Assembly-driven method model based on key measurement characteristics
Based on the development of assembly and information technology, researchers have proposed a “measurement-driven assembly” method model based on key measurement characteristics. The model not only focuses on the application of measurement technologies and processes but also the integration of measurement concepts, data, and methods into product design, process design, and assembly processes.
Through this approach, manufacturers can use measurement as a driver of the assembly process, thereby effectively reducing errors and improving assembly accuracy.
As shown in Fig.4, the Measurement-Driven Assembly model demonstrates how data integration through key measurement characteristics ensures a high degree of synergy between the measurement and assembly processes. In this way, manufacturers can ensure that every part of a product is assembled to meet the design requirements, thereby reducing later adjustments and rework.
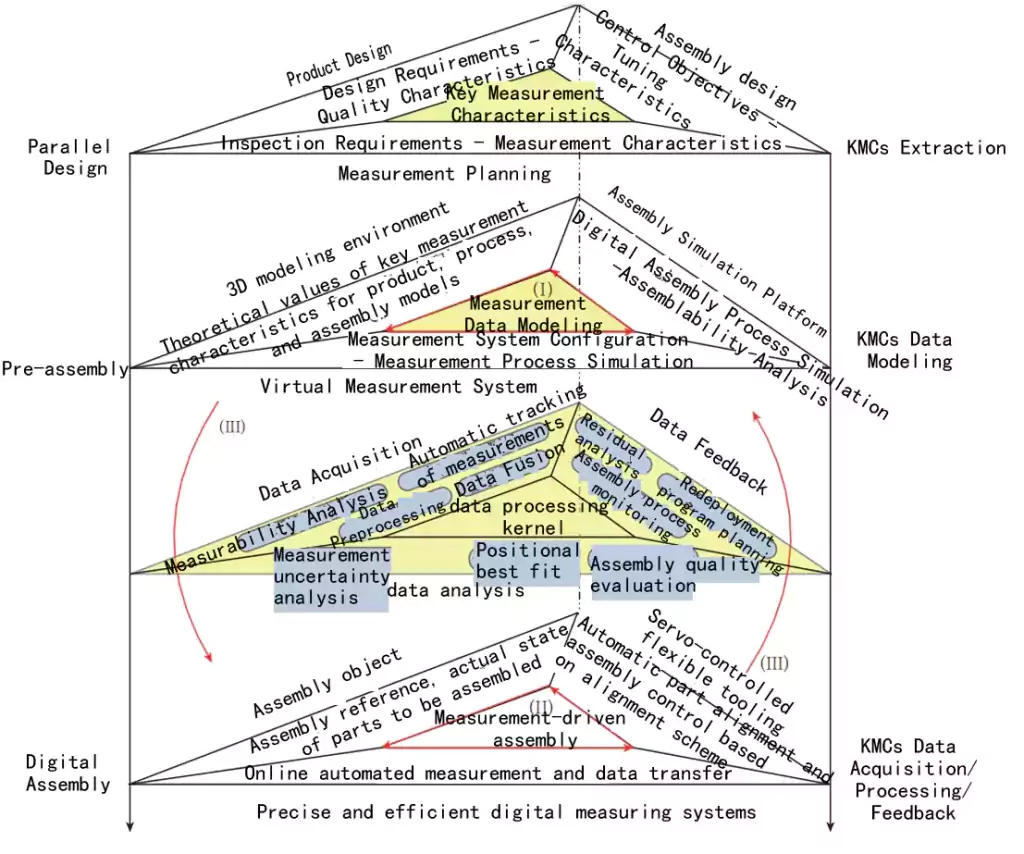
Fig.4Theoretical methodology model of measurement-assisted assembly based on key measurement characteristics
3.Multi-measurement system synergy and data fusion technology
In the process of large-size precision measurement, a single measurement system is often unable to meet the high accuracy requirements. Therefore, the use of multi-measurement system synergy, combined with different types of measurement equipment, is an effective way to improve measurement accuracy and efficiency.
Through the fusion of heterogeneous measurement data from multiple sources, manufacturers can obtain more accurate measurement results and ensure that each step in the assembly process is fully verified.
At the heart of multi-measurement system integration lies data fusion technology. These measurement systems often come from different vendors and use different data acquisition standards and formats.
Therefore, how to realize the coordination between these systems and ensure the effective fusion of measurement data is one of the keys to the development of the technology.
As shown in Fig. 5, the model-based unified measurement dataset representation and interoperability technology provides a solid foundation for data fusion of multiple measurement systems.
First, the measurement process of a digital measurement system needs to be modeled, simulated and, layout optimized to ensure that individual measurement devices work together. Second, the fusion of measurement data must take into account the accuracy differences between different measurement devices, especially when the measurement environment is unstable, how to deal with uncertainty, bad points, and, invalid data is the key issue.
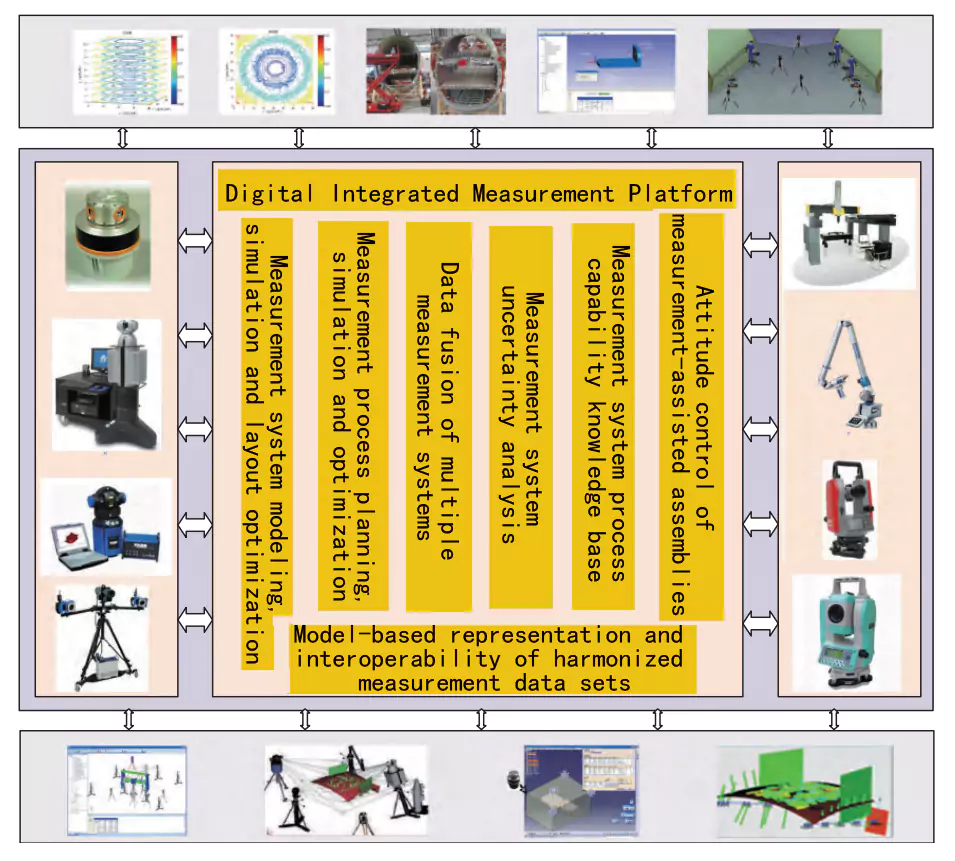
Fig.5 Basic framework for integrating the multiple measurement systems and data fusion
4.Multi-source and heterogeneity of measurement data
When multi-measurement systems work together, multi-origin and heterogeneity of measurement data are two issues that need special attention.
Multi-source means that the coordinate data of the same target point may come from different measuring devices, while heterogeneity is manifested in the fact that the data provided by different measuring devices have different accuracies, especially in complex assembly environments, where the data may be interfered with by external factors.
In the process of data fusion, the accuracy weights of different measurement systems must be reasonably assigned. This is not only a fusion of the data itself, but also of the data accuracy. With this approach, manufacturers can ensure high accuracy in the final measurement results and can better support the precise execution of measurement-assisted assembly.
As shown in Fig.6, in an aircraft segment docking application, the indoor GPS serves as a feedback signal to guide the robot in adjusting its position, while the LiDAR is responsible for performing measurement compensation. This multi-measurement system working in tandem not only realizes high-precision target positioning but also adjusts the assembly process in real-time through data fusion technology.
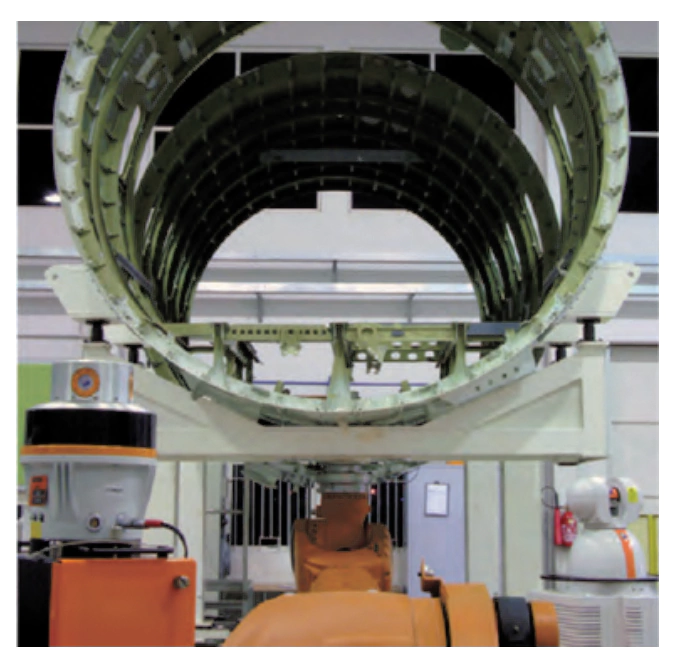
Fig.6 Multiple measurement systems applied in the alignment of aircraft component
5. Uncertainty analysis and measurement
In the process of large-size precision measurement and assembly, uncertainty analysis is one of the core technologies in large-size precision measurement and assembly, and it ensures the efficient operation of the measurement system. Different measurement equipment ant environments may lead to errors in measurement results, so how to analyze and handle these errors is an important topic in measurement and assembly integration.
Through uncertainty analysis, manufacturers can identify factors that may affect measurement accuracy and take appropriate technical measures to compensate. At the same time, building a knowledge base of the measurement system’s process capabilities can support subsequent measurement system coordination and data fusion to ensure efficient execution of the measurement process.
Ultimately, the attitude control technology of measurement-assisted assembly also plays an important role in this process. By accurately controlling the attitude and position of the measurement equipment, the manufacturer can ensure that each component is assembled at a precise location, thereby improving overall assembly accuracy and reducing errors in production. As shown in Fig.7.
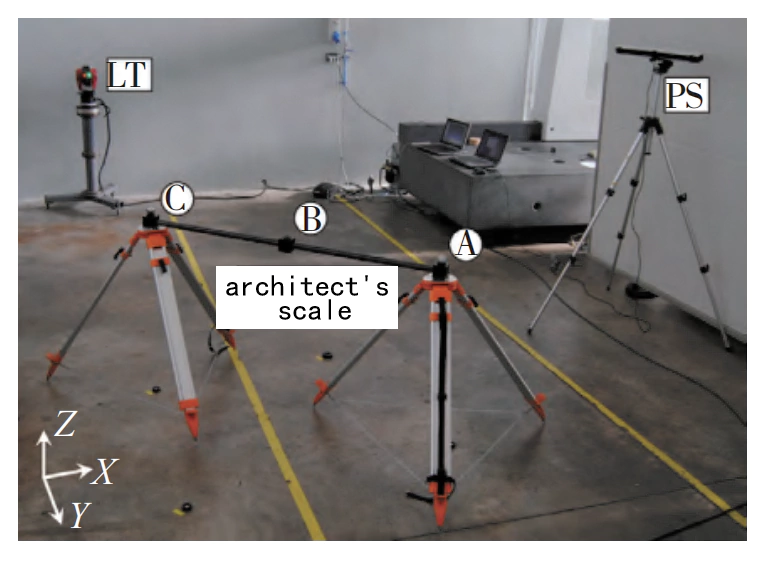
Fig.7 Cooperation measurement of laser tracker and digital photogrammetry
Measurement-assisted assembly
1. Digital Assembly Process
Measurement-assisted assembly uses digital definition, simulation, tracking, and mechanical positioning technologies. Digital measurement systems track component positions. They guide adjustments to ensure precise assembly.
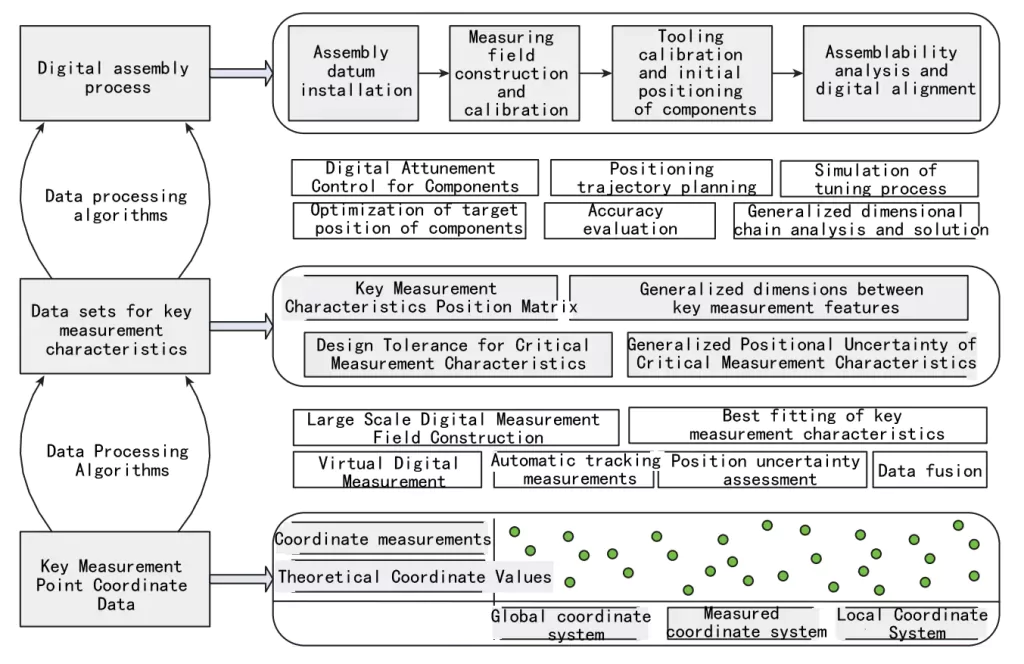
Fig.8 Relationship among the core algorithm of measurement-assisted assembly, data, and process
2. Core Algorithms and Data Flow
The assembly process depends on data models, processing algorithms, and continuous analysis. These elements transfer and synchronize data throughout the product’s assembly stages.
3.Raw Data and Processing
Raw data includes coordinate measurement values and theoretical target points. Pre-processing and integration of this data help identify key measurement characteristics. They also generate the assembly relationship data model.
4 .Types of Core Algorithms
Core algorithms belong to four categories: digital measurement field construction, data preprocessing, relationship analysis, and assembly execution control. These algorithms make the assembly process run efficiently.
5.Case Study: Airbus A380
In the Airbus A380 fuselage assembly, the LiDAR MV260 measures connection positions. Brunson’s bracket adjusts the segment. SA software processes the data and shows the actual position and deviations.
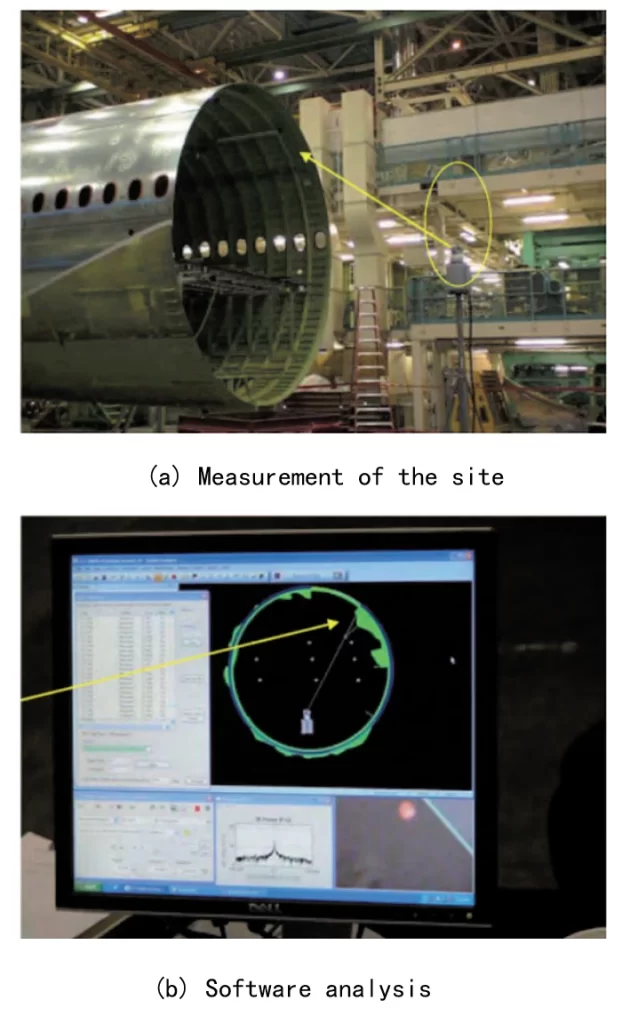
Fig.9 Laser radar applied in the alignment of fuselage
Model-Based Inspection Quality Assurance
To improve and ensure product quality, the inspection of product parts is essential. Before starting parts inspection, it is crucial to develop a well-structured inspection plan.
1.Goals of Inspection Planning
Inspection planning ensures consistency and effectiveness in the parts testing process. It covers testing steps, methods, tools, and other key factors. A well-developed plan outlines the testing sequence, testing objects, and requirements, offering guidance for on-site inspections.
2.Model-based Inspection Benefits
With model-based inspection planning, information is directly sourced from the three-dimensional design or process model. This approach eliminates previous issues such as duality in the inspection process and unsynchronized design changes. It enables the digital measurement system to perform inspection tasks, connecting digital inspection with design and manufacturing to improve product quality.
3.Basic Architecture for Quality Assurance
To maximize the potential of digital inspection technology, the authors propose a basic architecture for model-based inspection planning and quality assurance, as shown in Fig. 10. This architecture integrates computer-aided 3D inspection planning with inspection data and business management through a unified 3D inspection model.
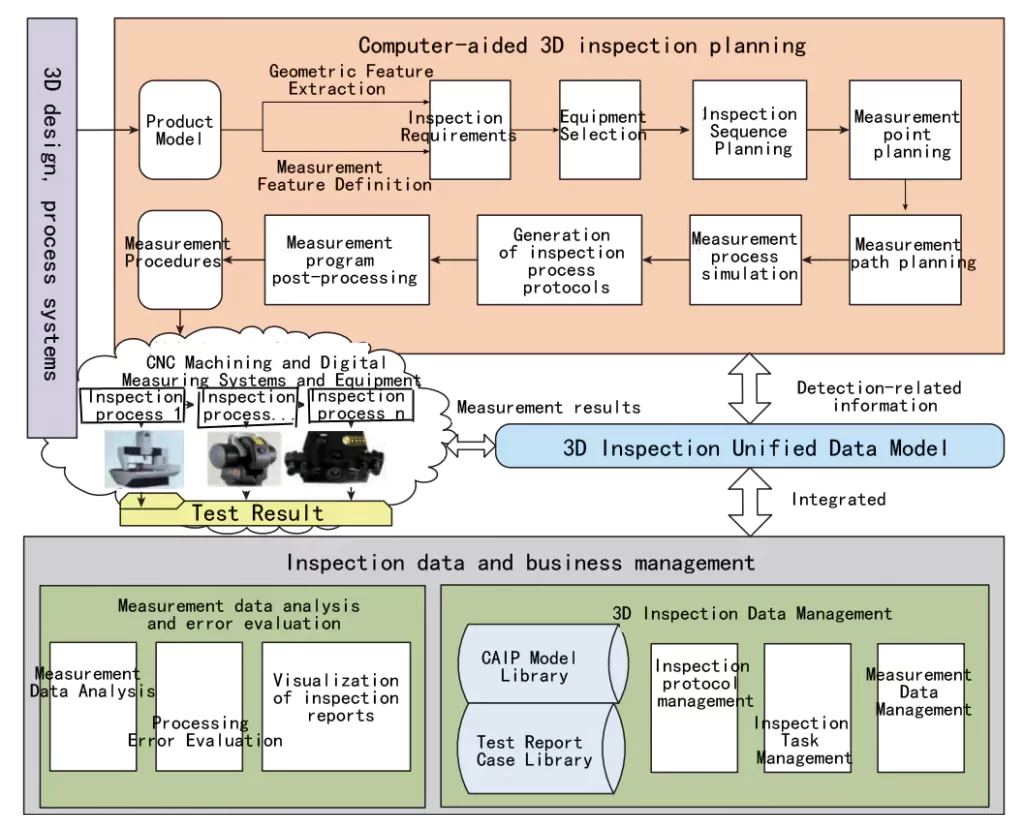
Fig.10 Inspection planning and quality assurance based on the model
4. Computer-Aided 3D Inspection Planning
3D inspection planning is built using modeling software that reads the product model from a 3D design or process system. Inspection characteristics such as inspection objects, tolerance values, and other requirements are obtained from the product model. Based on these needs, appropriate inspection methods and tools are selected, followed by the sequence planning of inspection steps.
5.Measurement Points and Path Planning
A reasonable layout of measurement points on the geometric surface of the inspection object is key. Measurement path planning is carried out next, followed by defining inspection protocols and measurement programs. The unified mathematical model of 3D inspection integrates the inspection model, lightweight model, inspection protocols, measurement procedures, and inspection reports in a standardized information framework.
Inspection Data and Business Management
The goal of inspection data and business management is to ensure unified, standardized, and traceable management of digital inspection data. Measurement data is analyzed to assess errors in the process and generate various forms of inspection reports.
As illustrated in Fig. 11, a Leitz CMM with a precision rotary table is used to inspect the leaf disk after inspection planning. Fig. 12 introduces an error model based on precision inspection planning for free-form surface machining, helping identify the maximum error position through measurement.
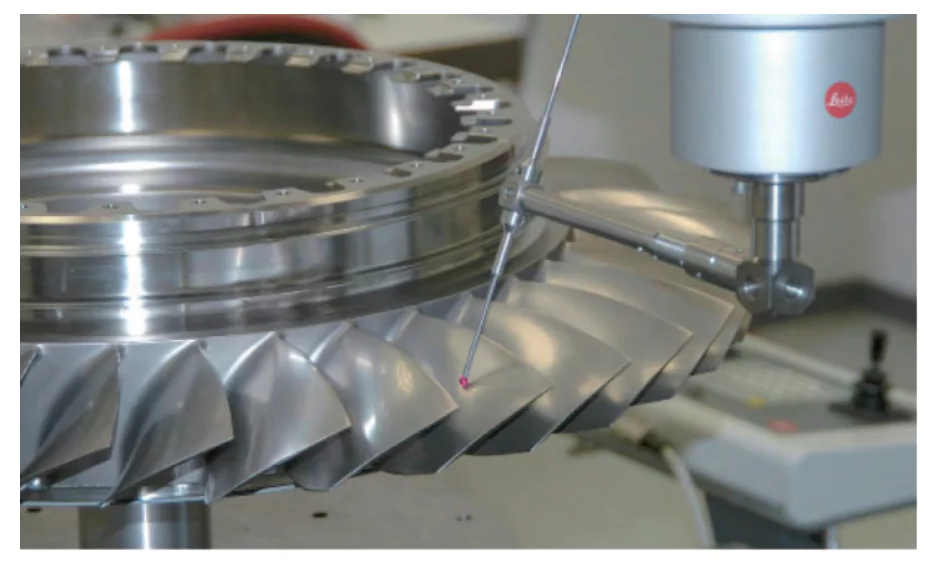
Fig.11 Blisk inspected by coordinate measuring machine Leitz equipped with a precise turntable.
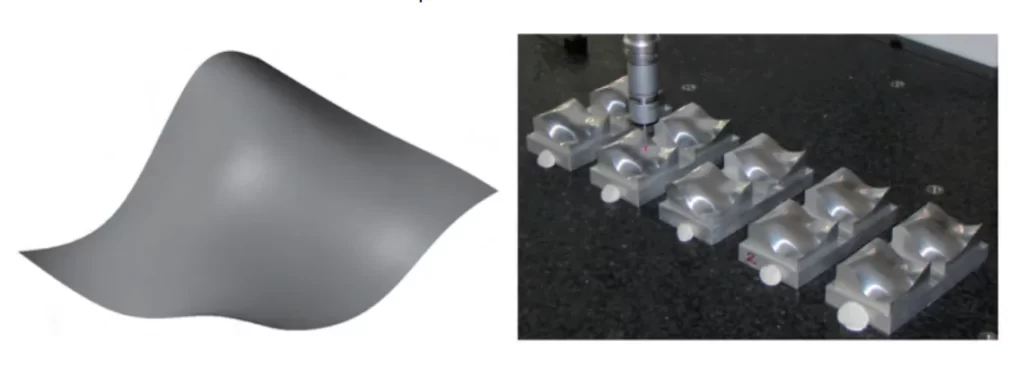
Fig.12 Maximum error measurement for freeform surface based on CMM
Task-oriented measurement uncertainty analysis
1.Conventional Measurement Methods
Conventional measurement methods evaluate results intuitively and reliably. However, coordinate measurement results are more abstract and less convincing.
2.Measurement Uncertainty Theory
Measurement uncertainty theory provides a scientific way to evaluate results, building on traditional error theory. It is a factor related to measurement results. It describes the degree of variation in the assigned value. As a statistical concept, measurement uncertainty is an inherent property of digital measurement systems.
3.Task-Oriented Measurement Uncertainty
Task-oriented measurement uncertainty analysis does not simply add up uncertainty factors. It also considers how each factor impacts the task and how the factors are correlated. These correlations follow specific transmission laws.
Yang Jingzhao from the National University of Defense Technology proposed a task-oriented measurement uncertainty analysis program. He relied on existing methods as a foundation. Introducing the Monte Carlo assessment method, he simulated the measurement process. Additionally, he proposed an uncertainty assessment method based on gray theory and neural networks, as depicted in Fig. 13.
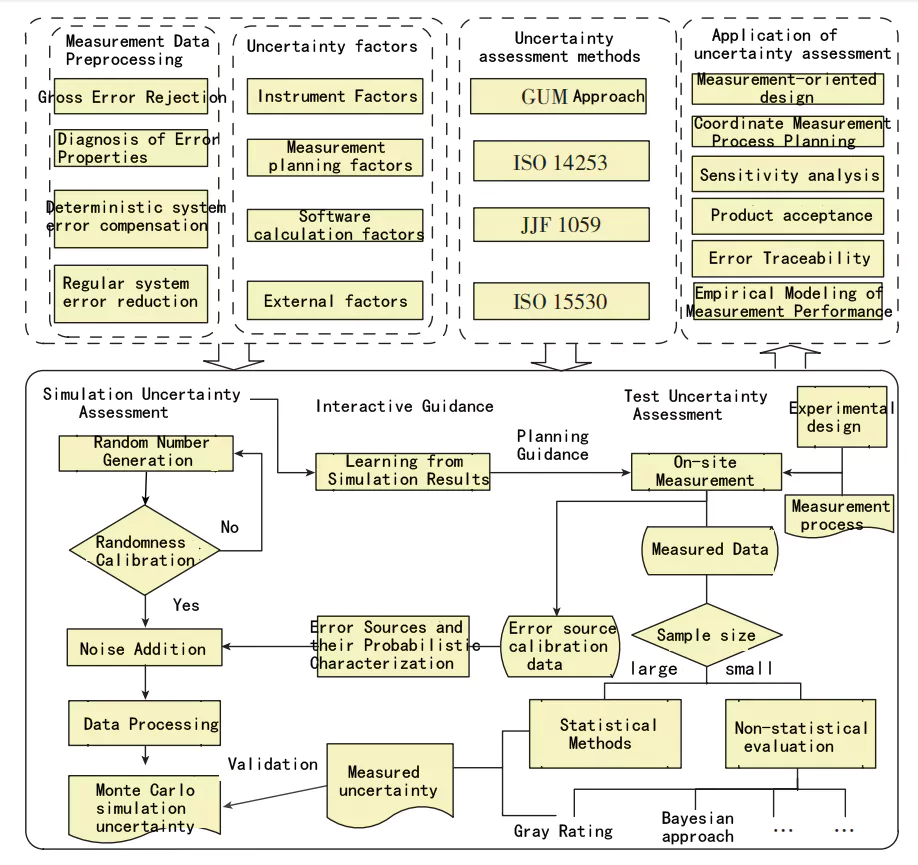
Fig.13 Uncertainty analysis of the task-oriented measurement
4. Pre-Processing and Uncertainty Evaluation
During the pre-processing stage of measurement data, we can compensate for or reduce deterministic systematic errors using appropriate methods. For random error uncertainty, we select a suitable evaluation method.
The Guidelines for the Evaluation of Uncertainty in Measurement (GUM) provide Class A and Class B evaluation methods. These include the experimental method in ISO 11530, the model-based GUM uncertainty framework, and the Monte Carlo method.
5. Monte Carlo and Simulation Methods
The literature uses the Monte Carlo method to evaluate measurement uncertainty for laser tracker results in multi-station time-sharing measurements. Similarly, simulation and experimental methods evaluate the measurement uncertainty of CMMs.
The literature also discusses the mathematical definition, analytical algorithm, and uncertainty sources in position measurement for large aircraft assemblies. The API laser tracker T3 tracks the motion of the spindle of the measuring machine. It collects 3D coordinates and then adjusts large 5-axis and 6-axis machine tools. The system uses spatial error checking and compensation technology.
Conclusion
Large-size precision measurement technology has become a research hotspot in the manufacturing field, although its core technology is still accumulating and verifying. The digital measurement system is developing in the direction of portable, networked, and, efficient precision, and the e-size precision measurement has transformed from single technology to multi-sensor fusion.
This paper analyzes the application of large-size measurement technology and digital assembly integration, proposes a multi-measurement system integration and data fusion architecture, introduces the core algorithms of measurement-assisted assembly of data and process, proposes a model-based inspection planning and quality assurance framework, and summarizes the task-oriented measurement uncertainty analysis method, which provides technical support for engineering applications.
In the future, the collaborative work of multiple digital measurement systems will promote the change of high-precision large-scale industrial production mode and enhance the international competitiveness of the manufacturing industry.
