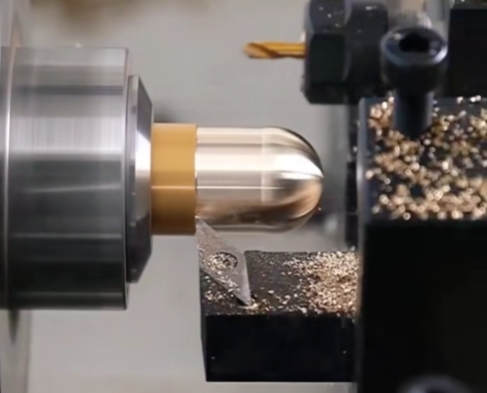
CNC machine tool turning technology is a production and processing technology based on digital technology and intelligent terminals. This technology can achieve high-precision control of CNC production in the processing and production of parts, ensuring that the results of processing and production have high quality and acceptance rate [1].
With the continuous development of the industry, the structures of mechanical equipment and production and processing parts are becoming more and more complex, and it is difficult to meet the high-precision production needs of combined parts based on a single production and processing technology [2]. Under the combined action of a variety of external factors, the parts produced will have quality problems to varying degrees. Especially during the mass production of parts, once errors occur in the programming, it will cause irreversible damage to the parts produced. , which ultimately leads to the quality of the production results failing to meet standards and being discarded or repaired.
Therefore, it is necessary to take feasible measures during production and processing to control various parameters in production in real time to improve the quality and comprehensive level of CNC machine tool turning. In this way, it is possible to improve the digital production capabilities of modern industries while ensuring production efficiency.

1. CNC machine tool turning quality control method
1.1 Reasonable selection of CNC machine tool turning tools
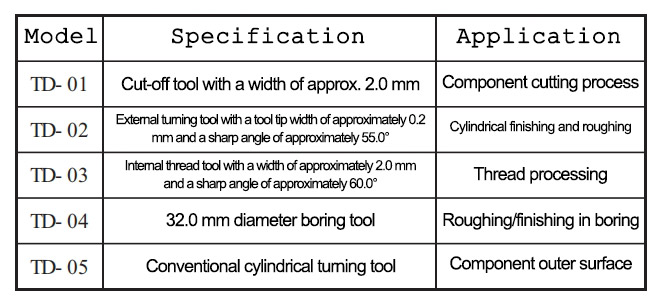
In order to ensure that the components turned by CNC machine tools meet the expected quality standards, it is necessary to select the corresponding processing tools according to the material of the components before processing. In order to avoid the problem of large processing dimensional errors caused by tool deformation, priority should be given to tools made of cemented carbide materials. In this design, YW-02 model carbide tools are selected as processing tools [3]. It has the advantages of wear resistance and anti-adhesion in practical applications. After clarifying the tool category, switch to different types of tools according to the actual needs in processing.
The available tool types are shown in Table 1.
1.2 Processing process design
After completing the selection of machining tools, optimize the machining process.
The specific process is: determine the starting point of the tool in CNC machine tool turning processing, and use it as the relative movement point of the tool relative to the component.
At the same time, establish the spatial coordinates of the CNC machine tool, clarify the spatial relationship between the tool and the component to be processed in this space, and use program compilation to set the tool change point during processing to avoid errors caused by tool change position errors during processing. Processing errors.

On this basis, in order to meet the accuracy requirements of components during processing, the CAK5647Di FANUC 0i mate type CNC machine tool is preferred, and the component clamping method is improved according to the characteristics of different types of components.
When rough machining the component, reserve the flange process on the left side of the component, switch the tool at the inner hole position of the process, and complete the fine machining of the component thread and other detailed structures [4]. After finishing the internal structure, a mandrel is used for clamping on the outer surface of the component.
The specific steps are: use a three-claw clamp to clamp the components → finely process the inner structure of the hole → rough machine the outer surface position.
In order to ensure the dimensional accuracy and quality of processed components, different processing procedures need to be treated separately. At the same time, in order to prevent components from being deformed by heat during cutting, it is also necessary to separate conventional processing and thermal processing methods. In this way, the accuracy and quality of processed components can be improved.
1.3 Precise control of cutting amount
In addition to the tool selection and processing process optimization proposed above, it is also necessary to accurately control the cutting amount of the component during processing.
For example, during processing, the turning tool should be reasonably selected, and according to the actual processing progress and component processing accuracy requirements, the cutting speed, turning tool feed speed, and the amount of cutting on the back of the turning tool should be comprehensively controlled [5]. Changes in each parameter will affect the turning behavior of CNC machine tools and the final processing quality to varying degrees.
Therefore, in actual operations, the CNC terminal and technical personnel should also do a good job in macro-control of the processing datum. In this way, processing errors are reduced and the dimensional accuracy of processed components is improved.
In addition, the component drawings should also be analyzed during this process [6]. If necessary, digital scanning technology can be used to scan the shape of the component, and the processing dimensions can be customized based on the scan results. In this way, the CNC machine tool can be ensured The level of turning processing has been significantly improved.
2. Verify the feasibility of this method
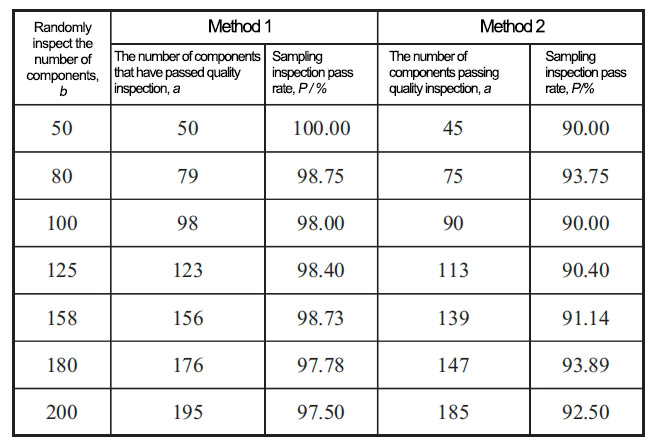
In order to meet the authenticity requirements of this test, an experimental comparative production was carried out. The statistical product data are as follows.

It can be seen from the test results shown that using the quality control method proposed in this article to optimize the CNC machine tool turning process can control the sampling inspection pass rate of processed components above 97.50%, while using method 2 to perform CNC machine tool turning processing quality Control can only control the random inspection pass rate above 90.00%, but it is lower than the 97.50% of the method in this article. In summary, the final conclusion of the comparative test in this article is drawn: The CNC machine tool turning quality control method proposed in this article can effectively improve the processing quality, improve the pass rate of random inspection of components, and reduce the scrap rate of components.
3. Conclusion
This article realizes the quality control of CNC machine tool turning processing from three aspects: reasonable selection of CNC machine tool turning tools, processing process design, and precise control of cutting amount. A large parts production and processing unit was selected as the participating unit in this test. Through comparative experiments, it was proved that the CNC machine tool turning quality control method proposed in this article can effectively improve the processing quality, improve the random inspection pass rate of components, and reduce the component’s Rejection rate.
Therefore, the method proposed in this article can be tried to be put into use in subsequent industrial production and processing. In this way, the processing and production efficiency and level of high-precision and complex structural parts can be improved.
References:
- [1] Zhang Mingyan, Zhang Huaping, Ma Yanbin. Analysis of the influence of clamping methods on the turning accuracy of slender shaft parts [J]. Machinery Manufacturing, 2022, 60 (1): 56-58; 48.
- [2] Zhu Xiaofei, Fan Shuangjiao, Yan Zhaobin, et al. Removal of burrs on the edge of turned outer circular surfaces by scanning cathode electrochemical finishing [J]. Surface Technology, 2021, 50 (12): 111-118.
- [3] Li Congbo, Yu Bisheng, Xiao Qunge, et al. Energy-saving optimization method of CNC turning batch processing process parameters considering tool wear [J]. Chinese Journal of Mechanical Engineering, 2021 (1): 217-229.
- [4] Wang Yun, Zhang Changming, Zhang Yu. Effect of turning parameters on surface roughness of difficult-to-machine materials and parameter optimization [J]. Modern Manufacturing Engineering, 2021 (2): 95-101.
- [5] Ma Furong, Tang Linhu, Li Baodong, et al. Experimental study on machined surface roughness and three-dimensional morphology of hardened steel in different hardening states by dry turning [J]. Tool Technology, 2021, 55(7): 110-114 .
- [6] Hao Mengjuan, Dong Guixi, Gao Lipeng, et al. Design of machine vision online inspection system for tower component hole making dimensions [J]. Combined Machine Tools and Automated Processing Technology, 2020 (2): 123- 127; 131.
